|
Well, small LAN parties just got that much more fun! This Pringles can is special as inside it has 1 GB of RAM, 8 GB of SD storage, a 6,600mAh battery, and a quad core ARM processor as well as tons of Pi running linux! Prepare for hours of offline multiplayer Quake or Minecraft as the can emits a WiFi signal anyone with the password can connect to and connect to the server inside. This tutorial shows how to install Minecraft just as a proof of concept. If you want to install quake download QuakeOnLAN for Pi online then skip to part two.
Collect the parts
The components list of the can is minimal but what you will need is-
A list to the wishlist of the parts used can be found here- http://www.adafruit.com/wishlists/412334
Part One- Installing a Minecraft Server
Connect your Raspberry Pi to your home network via a wired connection (It's much easier this way) then figure out what the Pi's IP address is by using Fing on iPhone or android, going to your routers webpage, or connecting a monitor and keyboard and loging in with username "pi" and password "raspberry" and typing in
ifconfig
The rest of this tutorial can either be completed by using a keyboard and monitor or using the program Putty to SSH into it using the IP you just found. Once you're all setup and in the Pi's command line, type in- sudo apt update
Upgrading will take a while, so go outside and play a game of catch with the first person who agrees when you ask. When in Raspi-config, go to advanced, and change the hostname to PringlesCan, then go into memory split and change it to 16 to allow more RAM to your server. It will ask if you want to reboot, hit yes and relogin. Now, since we installed Raspbian Lite, we need some tools to allow us to install and run the server. This would be git and Java Jdk, to install the two type in- sudo apt install git oracle-java8-jdk -y
Now make sure you're in the home directory, if you didn't use the "cd" command through any of this than you should be in it. Next we need to create a folder for the minecraft server so the home directory isn't a mess, and download BuildTools into it. mkdir Minecraft
Now run build tools, this will take a while so go grab a cup of coffee and read the paper sudo java -jar BuildTools.jar
The rest of this tutorial assumes the jar created is spigot-1.10.2.jar, but to see which version you have, type "ls" and see which spigot version you have and replace spigot-1.10.2.jar with your jar's version in my next commands. So now we need to run the server for the first time and agree to the EULA. sudo java -Xms512M -Xmx1008M -jar spigot-1.10.2.jar nogui
To agree to the EULA, replace "false" with "true". Press CTL+X, press Y, then hit enter to save the file. Run the server a second time, and this will take a while again so play a round or two of CS:GO gun game. sudo java -Xms512M -Xmx1008M -jar spigot-1.10.2.jar nogui
Now if you would like to test it, open Minecraft on another computer, and hit multiplayer and create a new server and paste the IP of your Pi in the address bar. You should then be able to join with a fair bit of lag. Hit CTL+C to stop the server. We need to reduce this lag so let's edit the server proprieties. sudo nano server.properties
You can either delete the entire file and paste below the entire contents, or just edit the view distance, max players, motd, and offline mode. Offline mode allows for the server to run without the authentication servers which when we are disconnected to the internet allows us to connect. Note when the server is in offline mode it's easier to hack or cheat in the server but it's necessary for us to run the server from the AP. #Minecraft server properties
Press CTL+X, press Y, then hit enter to save the file like we did with the eula. Next install a plugin to make the server run a little faster. You can install any bukkit plugin to this server by doing this. cd plugins
Last thing to do to setup the server is to make it run on startup. We do this by creating a script and editing the rc file. cd ~
Paste this into the blank file then exit nano as before #!/bin/bash
Once exited nano- sudo nano /etc/rc.local
Add below to the file before the line that says exit 0 then quit nano and save it and you're done part one! If you want to run the server without the AP use "sudo reboot" after completing the fallowing. bash /home/pi/minecraft.sh
Part Two- Setting up the AP
Okay, so now your server is installed, you need to uninstall wpasupplicant, so to do this run-
sudo apt-get purge wpasupplicant -y
Next install dchp, this will allow for everyone connecting to receive a IP address from the Pi which is kinda important. Then open the configuration file with nano. sudo apt-get install isc-dhcp-server -y
Open the configuration file with nano and scroll to the end and add subnet 10.10.0.0 netmask 255.255.255.0 {
Save and exit, then install hostapd. This software allows the Pi to emit a AP
sudo apt-get install hostapd
Next we need to set up hostapd to act the way we want nano /etc/hostapd/hostapd.conf
Add/Edit these lines and you can change the passphrase or ssid if you wish interface=wlan0
Next restart the pi, set the IP for the Pi, then run the AP sudo reboot
There! Now you should be able to look at Wifi networks around you on another computer and see one called PringlesCan! If you'd like you can connect, but I'd recommend just making it so it will run every time the pi starts up. sudo nano /etc/network/interfaces
Replace the chunk of lines involving wlan0 with- auto wlan0
Now make it so hostapd starts automatically- sudo nano /etc/rc.local
Add these lines at the end before exit 0- hostapd -B /etc/hostapd/hostapd.conf
Exit and save nano. The last thing is to enable ip4 forwarding nano /etc/sysctl.conf
Change the line #net.ipv4.ip_forward = 0 to the fallowing- net.ipv4.ip_forward = 1
Yay! Exit nano then type "sudo reboot" and you're done! Final Thoughts-
This is a very cool and usable project and is awesome to show off and play some games with friends. To use with Minecraft-
Some things I would do differently you can add would be a mini USB extension going from the charger to the outside of the can for easy recharge, a JST switch to remove and add power, and a power button.
To add a power button- http://www.instructables.com/id/Simple-Raspberry-Pi-Shutdown-Button/ Right now, to safely shut down the power, you need to be connected to the AP, then SSH into 10.10.0.1 and login then use "sudo halt"
0 Comments
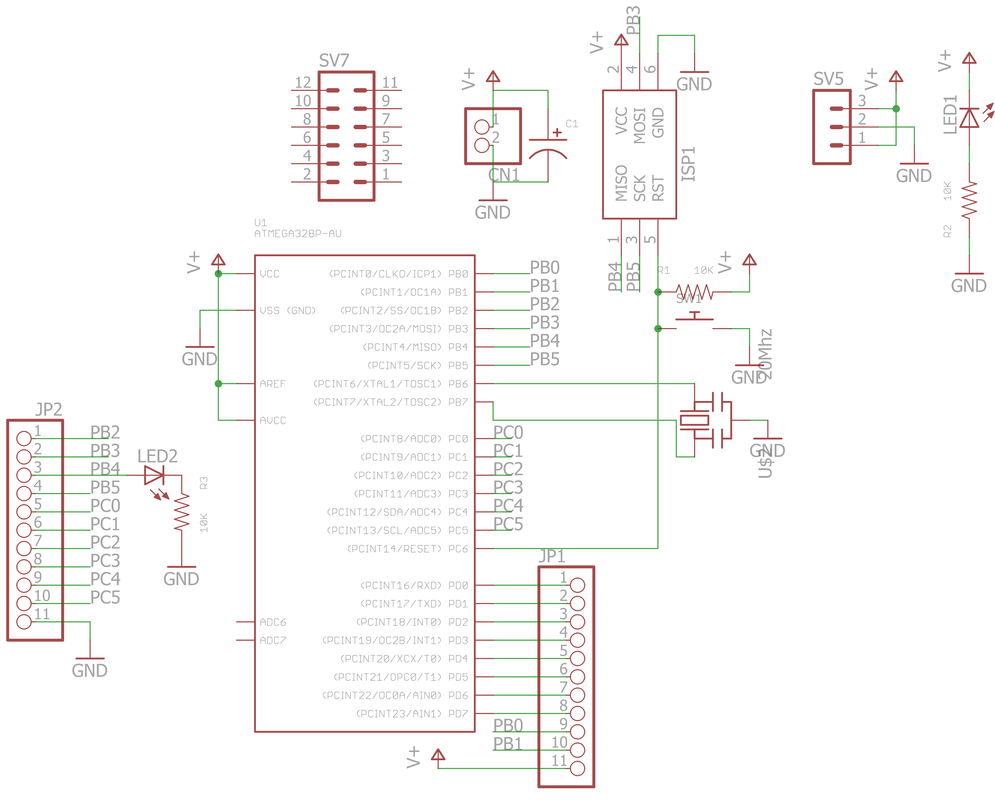
About a mouth or two ago, I was browsing the internet and came across a LeafyIsHere video. The video was titled THE MOST RACIST GIRL ON THE ENTIRE INTERNET (Linked) and I watched and heard this girl say extremely racist things about Muslims, Jews, and blacks. "Are you tired of all the lazy ass niggers who..." being a relatively mild quote. So immediately I went to her channel, went through a bunch of her videos, then filled out a very detailed report to YouTube about her and found a lot of stuff that was considered "hate speech". A couple days later I saw a video in my recommended section, and it was another LeafyIsHere video titled THE MOST RACIST GIRL EVER GETS BANNED FROM YOUTUBE and turns out she got her channel taken down. So here is the moral dilemma. Someone spread 'hate speech', and it was taken down. I ask, should this have happened? Sure her opinions were racist and not really okay, but she should have just as much a right to try to spread her opinions as me on this blog. So in the EU, a agreement was passed among google, twitter, and other giants that all hate speech is to be removed. So now it's up to these giants to say what you can say and remove what they don't want you to say. Is this the start of the removal of right to free speech? Just consider this, and support true freedom of speech.  Why write this?So there are two ultra books that came out recently. The 2016 MacBook, and the HP Spectre. The MacBook can come with a m3, m5, or m7 processor, has 10 hours of battery work, 8GB of memory, PCIe storage, Intel 515 graphics, and runs El Capitan. Any gamer or enthusiast or anyone in the comments section of any YouTube video made about it scoffs at it, calling it under powered and useless. The Spectre is marvelous. You can choose a i3, i5, or i7 and up to 8GB of RAM as well as PCIe storage. Now you would think people in the comments would go "OH WOW! THIS IS AMAZING AND WE NEED THESE!" people were all "Who would use this? We don't have a use for it, it can't game, and for every other use it's useless". So this article is uses for each (Intel) CPU and why you would want them. I want to send this to every commentator. The Idea So there are many many micro controller development boards out there. You can find them on Tindie, Sparkfun, Adafruit, the list goes on and on. I wanted to build my own from scratch and was thinking for a long time in the back of my mind on how to make mine unique. At work we used the nRF24L01+ chips and it was a pain in the ass to use with a Arduino UNO without a breakout with a voltage regular and level converter built in. So there was my answer, build a board where small modules like the nRF24 module. It needed to meet some standards. It would need to be breadboard compatible, it needed to work with 5 or 3.3 volts, and small modules needed to be easily mounted and connected. The Design Choices So the AtMega328p was chosen, as it works well for the requirements and is used in other development boards. There were headers added to both sides to add breadboard compatibility and a prototyping area for mounting of small modules like the nRF unit. A JST connector was added as it was small and could be easily connected to a Lithium Ion battery (Not recommended, but a direct unregulated connection to a battery would in fact work). There is a ICSP six-pin connector for programming, a reset button, a LED for easy debugging, and a three pin power connector in the middle for the proto area.
First Power-On My hands were shaking a bit, I didn't have anyone check it over. I plugged in the ISCP programmer and the LED powered right up. I went and selected the correct board and selected the "Blink" sketch. I hit upload and a error came up and the IDE became red. I scrambled around the console looking for the error. It went and said "avrdude: Error: Could not find USBtiny device (0x1781/0xc9f)" I went and slapped my forehead. I then hit shift THAN upload and it went without error. But it didn't blink. I went through the schematic and found I was using the wrong pin and re-uploaded and it worked! The final thing was I found the timing was off, this was probably due to a incorrect choice of crystal. Pros and Cons and the Outcome So the outcome was unexpected in two ways, one positive and one negative. It worked! And without much tinkering or late nights like I expected. But the main problem was the timing was off. I used a resonator, I had never used one and it was very easy to implement, but a normal crystal would have been better and much more accurate. I haven't tried to use this with the nRF module, (I have had the board for a while but haven't had time to use it much) but I can't wait to try it. It fits well on a breadboard and it is so flexible! I will admit I am proud of myself, it works and it works well with the Arduino software and should also be with the Intel AVR Studio. It has 32KB of memory, 2KB of RAM, and it somehow works with the wrong speed of the resonator. And I would recommend to anyone who had a heavy interest in electronics to build your own specialized development board even if it's kinda useless for much. It's so much fun and it really makes you learn a ton. And yes, I am missing the RESET switch and the JST connector
-Samuel Archibald
So, I do a lot with my Asus laptop. But it's big and heavy and bulky. So it got me thinking, what is the best ultra portable? I picked five and want to see what the popular vote is. Results in a nice little graph- http://ow.ly/4mK1_Ua
I went to the local computer store one day in the summer and asked if they had anything they were throwing away. They ended up giving me an old HP Pavilion which ran Windows Vista. So I brought that home and used it a little for basic tasks, having to replace the hard drive with an old laptop hard drive I bought on eBay for $20. It ran Eagle CAD software and a little Folding@Home. This computer was running a Pentium and had 6GB of RAM so it was able to do that, but not much else other than that plus basic web browsing. Then it suddenly stopped working, and I figured out it was the power supply so again, I went onto eBay and found an old Dell server power supply that was kinda funny shaped so it didn’t fit into the case. Now it’s out of the case in pieces and I placed it on my desk behind my monitor for a while and then I learned about Plex media server. If you go to the Microsoft website, you can download a tool which will just create a USB boot drive for Windows 10 very easily. Then I went about installing it without a problem and I went through the steps, skipping the registration code then doing a “custom” installation. From there, I went ahead and installed MakeMKV and handbrake and Plex and started ripping a bunch of movies and TV shows I had on disc which was quickly put onto an external hard drive. Then I bought the apps and I could watch my movie collection on my iPad, Android, and Xbox One. (And yes, I have a Xbox One even though I’m a PlayStation fan. There are reasons) The Plex server worked great! It was simple, and easy, and worked without much hassle and had a bunch of awesome features. I ran RealVNC and port forwarded so I could access my computer from school so I could run Handbrake and MakeMKV all day with my iPad. The system worked great, but I wanted more. I then had the idea for my render farm project. So I set up the proof of concept on my server. I installed the Adobe Media Encoder free trial and other Adobe programs and set it up with a FTP server so I could drop videos to it from anywhere in the world so they could render and it worked a lot better than I excepted. With one of these home servers, it really becomes worth it to dumpster dive or even buy the components. They are really handy when it comes to file storage, media streaming, or improving your video workflow, and I would seriously tell almost everyone to get one because of how handy and cool they are. If you want a really easy, cool, and much faster way easier way to do what I've done- http://bit.ly/2090PUZ 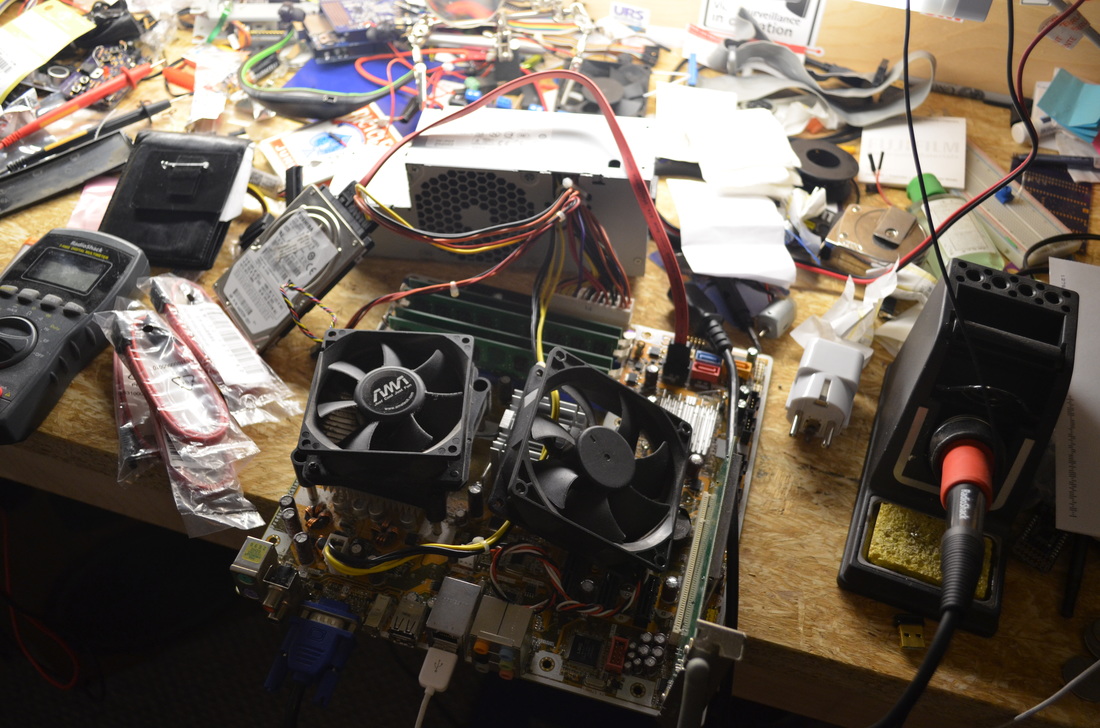 The 'Potato' computer being tested and put together
-Samuel Archibald So it's not unknown I work at McDonald's as well as do some engineering jobs. Hell, I'm 16. So as a person who finds these types of things interesting I admire the system in place there every time I work. I take the order at the register, it gets sent to the server for processing, the exact amount of cash that is taken is posted and the debit/credit card is processed. The register records my every move and sends it to two server towers in the office. Then the order is sent to the drive through, and sent to every screen in the building. Each time the food hits a step for instance being made, a worker hits the "Serve" button and then waits for the next step which then the next worker will hit serve until it's made it to the customer. This keeps track of how long the food stays at each station and the total average time on both the drive through and the front are displayed on the bottom of the screens. Each piece of equipment in the restaurant is heavy duty and precise. The drink machine is connected to the servers and automatically makes drinks as they're ordered in drive through. When someone needs a flavor shot, the machine that dispenses it puts in exactly the right about each time but sadly lacks buttons for multiple shots. You can select every type of coffee and every size and the dispenser will dispense the pre-programmed amount. There is a giant monster machine in the back that takes all the soda concentrates that come in special boxes, and turns it into soda by adding carbonized water then pumps it to all the soda dispensers around the building via plumbing in the ceiling which is all automatic. One thing that's hysterical is we use headsets to communicate to each other, and through the drive through. These headsets respond to a central unit above the first window that actually runs DOS and has two antennas on it for both polarization. Every machine with something edible in it has a timer and keeps track of the age of the food and each wasted product is recorded. The grills have these giant tops on them that lower onto hamburgers then when the timer is done slowly rise to cook the burger perfectly. Each step is to pump out as much food in as little time as possible as they can, and using all these machines and systems, they really succeed.
Sorry I haven't been posting much, will post another soon! -Samuel Archibald So in my High School, one of the directors of the company I work for teaches in the 'Everyday Engineering' class. In the class one of the things they build is hydraulic cranes from syringes, medical tubing, and syringes. These cranes work surprisingly well but it leaves the user with holding three syringes trying desperately to complete the challenges and remember which syringe moves which direction. Mr. Hall asked me if I could build a circuit to control the cranes with user input. We so far went through two revisions and are going on a third. The motor drivers are SN754410s, revision one was large and had two large joysticks and a ATMEGA328 embedded right onto the board. The second revision replaces the micro and joysticks with just tactile switches connected strait to the motor drivers. The third revision will just be a button layout change and some small touch ups. There will also be a version with joysticks and a micro like the first revision except hopefully smaller than the first one. These boards can deliver a massive amount of power for such small boards. Each has four channels which can deliver up to 35 watts of power anywhere from 7-35 VDC and can operate for a good amount of time when heat sinked. This has been a rather successful project and was quite fun and it drives the cranes very nicely. I modeled all the 3D parts and they were printed on a Dremel 3D printer. The model consists of a base, a pinion, a rack, and a door to slide the pre-made gearbox/motor module.  ^Next Revision^
-Samuel Archibald 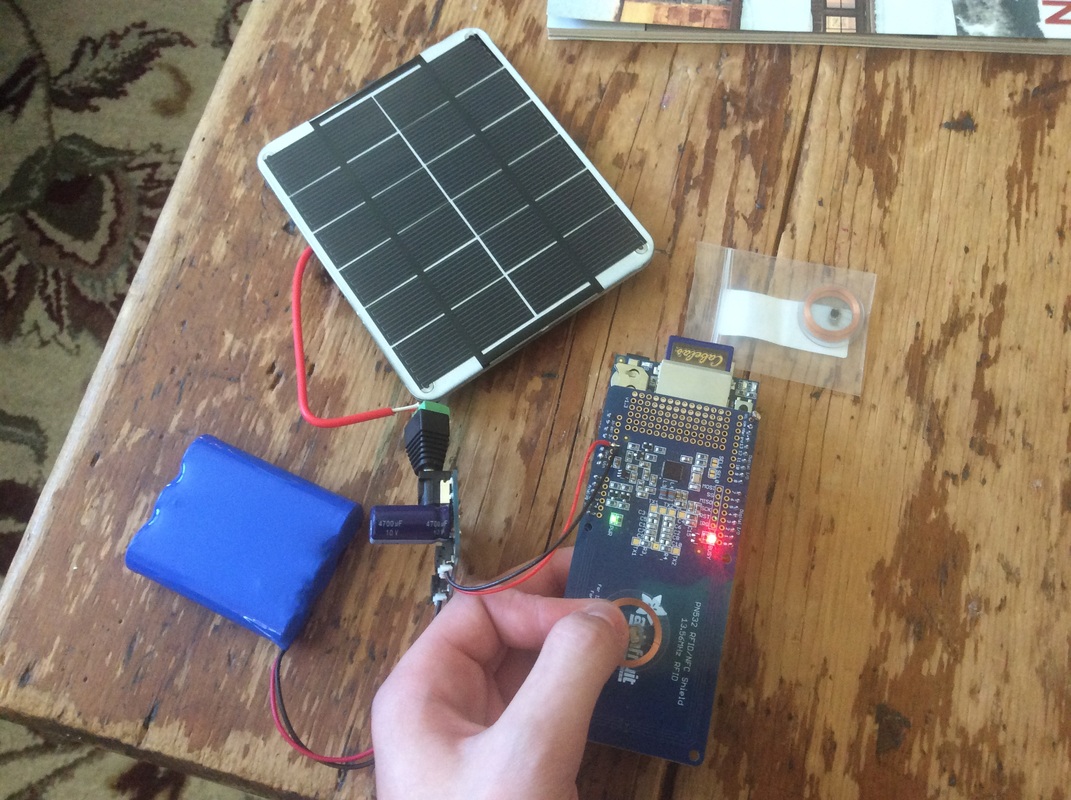 I was approached a week ago by one of the teachers at my local high school who was Mr Delcourt. Mr. Delcourt teaches a class where they tag squirrels with these bands around their bellies in a forest areas. Then feeders with trail cams record and (Assumed, if not than students) lab assistants and the number of squirrels with and without the tags are recorded. This project was funded by the school but Mr. Delcourt had a better idea- glue a radio frequency identification tag on the the current tags and place readers on the feeders. He came to me and asked me about it and I gave him a working prototype in three days with the help of Adafruit. Used is a Arduino UNO, a Adafruit RFID/NFC shield based off the PN532, a Adafruit data logging shield with a built-in RTC and SD card reader, and a DC lithium ion battery charger with a 2W solar panel and a 6600 mAh battery. A JST cable goes from the NFC shield to the charger to easily disconnect and reconnect power. The reader reads a input like this- 0x3e 0x35 0x87 0x3D 0x23 Then it stores that value onto a SD card with a time stamp from the RTC, which then someone can take out the SD card and go through seeing which squirrel went onto the feeder. Some things we want to add in the next prototype would be a PIR or weight sensor to detect if a unIDed squirrel uses the feeder, a light sensor to tell the micro to go into a less power intensive state when it gets dark, a ATMEGA running at 8 mHz instead of the UNO's 16 mHz to use at lower voltages, and a circuit to allow us to use the solar panel even in dark days. One software feature we want to add is the ability to sleep for a second, read the sensors, record if there is one, then go back to sleep for a second. This project is very popular with the science teachers, and has the honor of being the first post on this blog! Comment down below and ask any question or state any comment, thanks guys for reading! If you want to download the software I made to record the battery's voltage over a period of time, take a look on my GitHub. -Samuel Archibald  |
Archives
September 2016
Categories"How many people your age have done what you've done?"-AMW (2015)
|


 RSS Feed
